Bash GUI Whiptail Menu Tutorial Part One
From the archives of past personal sites. I was able to pull this tutorial out of the Internet WaybackMachine from way back in 2017.
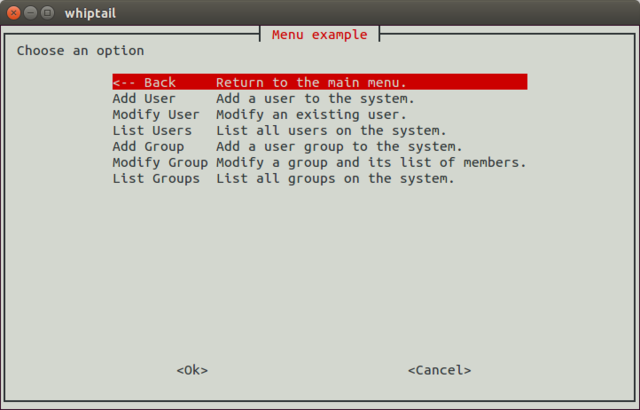
Fig. 1. whiptail --menu list fit
Source: Adapted from [1]
A Note from 2025
This was a guide I wrote in 2017 that I found on the Waybackmachine Internet Archive. It should still be valid today. At the time, there was very little information available on the Internet about whiptail besides the man pages but it may still serve as useful to someone out there Googling. Enjoy!
Introduction
Lowering the barriers of complexity for users is always something I’m interested in for the simple fact that it allows more people access to my work.
In this series you may attempt to follow along as I build a Whiptail menu with several different widgets and explore different properties of each widget to understand what can be done with this command line GUI library. If this article helps you, please leave a comment. I’d love to hear how you applied the knowledge and why.
History
Whiptail is part of the Newt library written in C and is already available in most distributions of Linux straight out of the box which makes this a very low barrier feature library. Newt is still under stable development and continues to receive updates in 2017. Whiptail is feature complete from the perspective of having just about all the text based GUI widgets you would expect on the CLI. It is not based on event driven architecture which actually makes sense for most scripting applications and reduces some complexity.
Prior to Whiptail, Ncurses was often used for this task and you may have seen it out in the wild still. It is slightly less aesthetically pleasing in this authors opinion. Ncurses is also written in the language C.
Prior to Ncurses were other Curses libraries first developed by Berkeley for BSD in the 1980’s.
You can learn more about the Newt library on Wikipedia and around the web. Unfortunately the wikipedia link was one of the better written articles I could find on the topic.
https://en.wikipedia.org/wiki/Newt_(programming_library) 🔗
Get Started
Open a Terminal or SSH to a Linux Machine and Run the Following
sudo apt install whiptailCreate a New .sh File for Testing and Make It Executable
# Create our configuration file before editing.touch whiptailexample.shMake the Script Executable
# Set permissions on the script so that it can be executed.chmod +x whiptailexample.sh# Edit the scriptnano whiptailexample.shCreate a Humble Message Box
#!/bin/bash
whiptail \    --title "Humble Title" \    --msgbox "I am a humble messagebox." 8 45
Nano Hotkeys
CTRL+O to saveCTRL+X to quitTry to Run the Script
./whiptailexample.sh
Excellent, Now a Breakdown of the Last Set of Instructions, Refer Back to the Code
- whiptail: tells the terminal we want to draw something.
- —title: creates a title for the window.
- —msgbox: Creates the box to store a message in.
- 8: This designates the height.
- 45: This designates the width of the box.
Ask a Yes/No Question
Using the steps you learned in the first example, create (touch) a new file and try the following:
if (whiptail --title "Humble Title" --yesno "What is logic?" 8 78) then echo "Yes." else echo "No."fiExit Codes
Exit codes are how bash responds depending on what the user chose. We can then use exit codes to choose a logical path for the program to take next. Let’s try another one but this time show the exit codes depending on the answer provided.
if (whiptail --title "Humble Title" --yesno "What is logic?" 8 78) then echo "Yes, the exit status was $?." else echo "No, the exit status was $?."fiThe $? is a bash variable designed to display exit codes and handy for debugging.
Menus
Menus are a seamless experience, moving from one selection to another in a coherent way that gives users expectations from their previous experience. Let’s build out the next example together.
First, I want to build this as a function. A function is just a block of code that can be repeatedly called when necessary. Functions work well for this because you may want to reference a menu item several steps backwards later. Think of a wizard that allows you the option on step 7 to return to step 1.
Function Example
function advancedMenu() { # Code to execute. # Old facebook friendships to execute.}# Hey! Here's a function, so call it maybe.advancedMenuAlright, now whenever we want to fall back to this menu we can call the entire block of instructions with simply “advancedMenu”.
Take a look at the script first and I’ll go through the less obvious bits.
Menu in a Function
function advancedMenu() { whiptail \ --title "Advanced Menu" \ --menu "Choose an option" 15 60 4 \ # height width line-height "1" "Option 1" \ "2" "Option 2" \ "3" "Option 3" \ 3>&1 1>&2 2>&3}#This calls the function to begin.advancedMenuWe need to provide the line-height for each line option. That’s the number 4 added after the width below. I’ve also added options for the menu. Each option has key value and a string value for the option. The key is used later to determine which option the user selected and serves as kind of an index number.
Finally on line 8 you’ll see this “3>&1 1>&2 2>&3”. What the heck is that?
This is a somewhat advanced concept for bash in my opinion and not vital you fully understand it.
Bash has standardized meanings for the following numbers:
| Number | Description |
|---|---|
| 0 | stdin: The input number or option number the script inputs. |
| 1 | stdout: The output number returned from the selection. |
| 2 | stderr: The error number that we saw earlier using $?. |
| 3 | A placeholder to store the number we want to overwrite the other options with. |
This tells whiptail to use the key we provided by overwriting stdin and stdout with what the user selected. It’s the kind of clever programming trickery we all just accept and use because it’s so clever. Try not to think too hard about it.
Moving on Now our menu has options. The last part part is linking those options to actual things that will happen when the user selects one.
Advanced Menu
function advancedMenu() { ADVSEL=$(whiptail --title "Advanced Menu" --fb --menu "Choose an option" 15 60 4 \ "1" "Option 1" \ "2" "Option 2" \ "3" "Option 3" 3>&1 1>&2 2>&3) case $ADVSEL in 1) echo "Option 1" whiptail --title "Option 1" --msgbox "You chose option 1. Exit status $?" 8 45 ;; 2) echo "Option 2" whiptail --title "Option 1" --msgbox "You chose option 2. Exit status $?" 8 45 ;; 3) echo "Option 3" whiptail --title "Option 1" --msgbox "You chose option 3. Exit status $?" 8 45 ;; esac}advancedMenu- We assign ADVSEL as a variable to the whiptail options so that we can store the key the user selected and call it from the case later to match with the selection.
- We create a case for each selection. A case is like an if statement but provides more possible paths. Rather than writing endless nested if statements this is easier to read.
- I also added another whiptail message box to each selection but you could also add a function call for another menu item or any other bash scripting.
References
[1] Linquize, "whiptail --menu list fit," *Wikimedia* 2017. [Online]. Available: https://commons.wikimedia.org/wiki/File:Whiptail--menu.2.png Accessed: Dec. 21, 2025.