Ansible Setup with Semaphore for LXC's on Proxmox
A walkthrough for setting up Ansible with Semaphore UI to automate tasks across Proxmox LXC containers, covering SSH key pairs, service accounts, inventory configuration, and your first playbook run.

Fig. 1. Gelsenkirchen-Erle, pipeline along the Emscher
Source: Adapted from [1]
At some point in your enterprise and homelab journey, you begin to recognize that automating the general maintenance of various systems becomes heavy on time and effort to keep everything in tip-top shape. After SSH’ing into the 5th, 20th, or 50th connection to run the same few commands, you may think to yourself: there has to be a better way. A lot of solutions exist to relieve these pressures. As you get into infrastructure as code, plenty of platforms will pull for your attention, and choosing the right path to automation nirvana matters just as much as getting there. Because of this, I always recommend putting serious effort into researching which automation platform you choose. After all, we don’t want our decisions biting us months or years down the road, reinventing the automation wheel. Keep in mind, the best solution is the one that actually gets implemented in your cost-value analysis.
For my homelab, personal preference carries a lot of weight. How I like to interact with my lab and maintain it, cost, and time investment are all big factors. Combine this with gambling on the future staying power of a platform, and the decisions are not always obvious. When we think of value, we also want to apply our project management skills here. Fads are kryptonite. Available documentation saves time. The size of the community and the potential for a friendly interaction when we need to find assistance are all part of the equation. These are all considerations before you even get to specifications, how the automation works, and so on.
If you value agentless experiences using built-in technologies that are often already available by default and well understood, Ansible is a great addition to any homelab. With the addition of Semaphore UI, we get a more robust, near enterprise solution.
Scope
- Proxmox: This post assumes a Proxmox environment with LXCs and VMs [4]. We’ll use Proxmox’s built-in binaries to help us create the environment that allows for secure connections between our automation platform and the various endpoints.
- LXC or VM Endpoints: We need something to run tasks against.
- Comfort with YAML & JSON: Ansible Playbooks and Semaphore rely on both of these structured text styles.
- Linux Comfort: We’ll be using a bit of bash, SSH, and more.
- Semaphore Setup with Ansible: This assumes you can handle Semaphore installation on your own via Docker or LXC. For Semaphore UI Installation see https://semaphoreui.com/docs/admin-guide/installation 🔗
Ansible
Ansible is an automation system for IT infrastructure, executing tasks on nodes, network devices, cloud platforms, and endpoints [2]. Ansible is open source, owned by Red Hat, and supports Linux, Unix, macOS, and Windows. Ansible is agentless. It handles connections and executes CLI commands via SSH. These tasks are written in YAML files called “Playbooks” that act as recipes describing the desired state of your systems: package installations, service configurations, file deployments, and more.
Semaphore UI Community Edition
Semaphore is a modern web UI for running Ansible playbooks, Terraform and OpenTofu plans, PowerShell and Bash scripts, and other automation tasks [3]. The community edition is open source, with Pro and Enterprise versions offering additional features. The limitations of the community edition outside of enterprise scenarios are very reasonable, and it has been around for nearly a decade at this point.
- Install Semaphore (Docker or LXC)
- Generate an SSH key pair and add the private key to the Semaphore Key Store
- Run the onboarding script from your Proxmox host to create the
ansibleservice account on each LXC - Configure Variable Groups in Semaphore for sudo / privilege escalation
- Define your inventory of hosts in Semaphore using YAML
- Create a git repository to host your Playbooks and connect it to Semaphore
- Create a test task and verify everything works
Setup Overview
The diagram below shows how the pieces fit together. Semaphore sits in the middle. It pulls playbooks from your git repository, connects to your LXC endpoints over SSH using the service account we create, and executes tasks with sudo privilege escalation.
flowchart TD
    A["🔧 Install Semaphore<br/><small>Docker or LXC</small>"] --> B["🔑 Generate SSH Key Pair<br/><small>ed25519 for Semaphore</small>"]
    B --> C["🔐 Add Private Key<br/>to Semaphore Key Store"]
    B --> D["🖥️ Run Onboarding Script<br/><small>from Proxmox host</small>"]

    D --> E["📦 OS Detection &<br/>Dependency Install"]
    E --> F["👤 Create ansible<br/>Service Account"]
    F --> G["🔑 Deploy SSH<br/>Public Key"]
    G --> H["🛡️ Configure Sudoers<br/><small>NOPASSWD:ALL</small>"]
    H --> I["🔄 Restart SSH<br/>Service"]

    C --> J["⚙️ Set Variable Groups<br/><small>JSON — sudo / become</small>"]
    J --> K["📋 Define Inventory<br/><small>YAML host groups</small>"]
    K --> L["📂 Create Git Repository<br/><small>& Connect to Semaphore</small>"]

    I --> M["✅ Create Test Task<br/>& Verify"]
    L --> M

    style A fill:#1a1a2e,color:#e0e0e0,stroke:#4a9eff
    style B fill:#1a1a2e,color:#e0e0e0,stroke:#4a9eff
    style C fill:#1a1a2e,color:#e0e0e0,stroke:#4a9eff
    style D fill:#2d1a1a,color:#e0e0e0,stroke:#ff6b6b
    style E fill:#2d1a1a,color:#e0e0e0,stroke:#ff6b6b
    style F fill:#2d1a1a,color:#e0e0e0,stroke:#ff6b6b
    style G fill:#2d1a1a,color:#e0e0e0,stroke:#ff6b6b
    style H fill:#2d1a1a,color:#e0e0e0,stroke:#ff6b6b
    style I fill:#2d1a2e,color:#e0e0e0,stroke:#ff6b6b
    style J fill:#1a2d1a,color:#e0e0e0,stroke:#6bff6b
    style K fill:#1a2d1a,color:#e0e0e0,stroke:#6bff6b
    style L fill:#1a1a2e,color:#e0e0e0,stroke:#4a9eff
    style M fill:#2d2d1a,color:#e0e0e0,stroke:#ffd93d
Diagram Legend
| Color | Track |
|---|---|
| 🔵 Blue border | Semaphore setup (install, keys, git repository) |
| 🔴 Red border | LXC host onboarding (via Proxmox bash script) |
| 🟢 Green border | Inventory & variable configuration (in Semaphore) |
| 🟡 Yellow border | Verification — all tracks converge here |
Create Service Accounts
The first step is creating the conditions in our clients and environment so we can hook our Semaphore UI to our endpoints. We’ll do this by creating a new user account on our Linux endpoints and providing an authorized key. If you don’t have SSH enabled on your endpoints, you’ll need to set that up first.
Create Public/Private Key Pair
Pull up your Semaphore server terminal. We’ll create a public/private key for use with our Ansible service accounts. This key will be used on each endpoint or LXC to authenticate SSH.
When asked to create a passphrase, leave it blank and hit enter.
ssh-keygen -t ed25519 -C "semaphore-automation" -f ~/.ssh/id_ansibleThis creates two files:
id_ansible: This is your private keyid_ansible.pub: This is your public key
Open the private key and copy the contents to your clipboard, including the header and footer lines exactly as they appear.
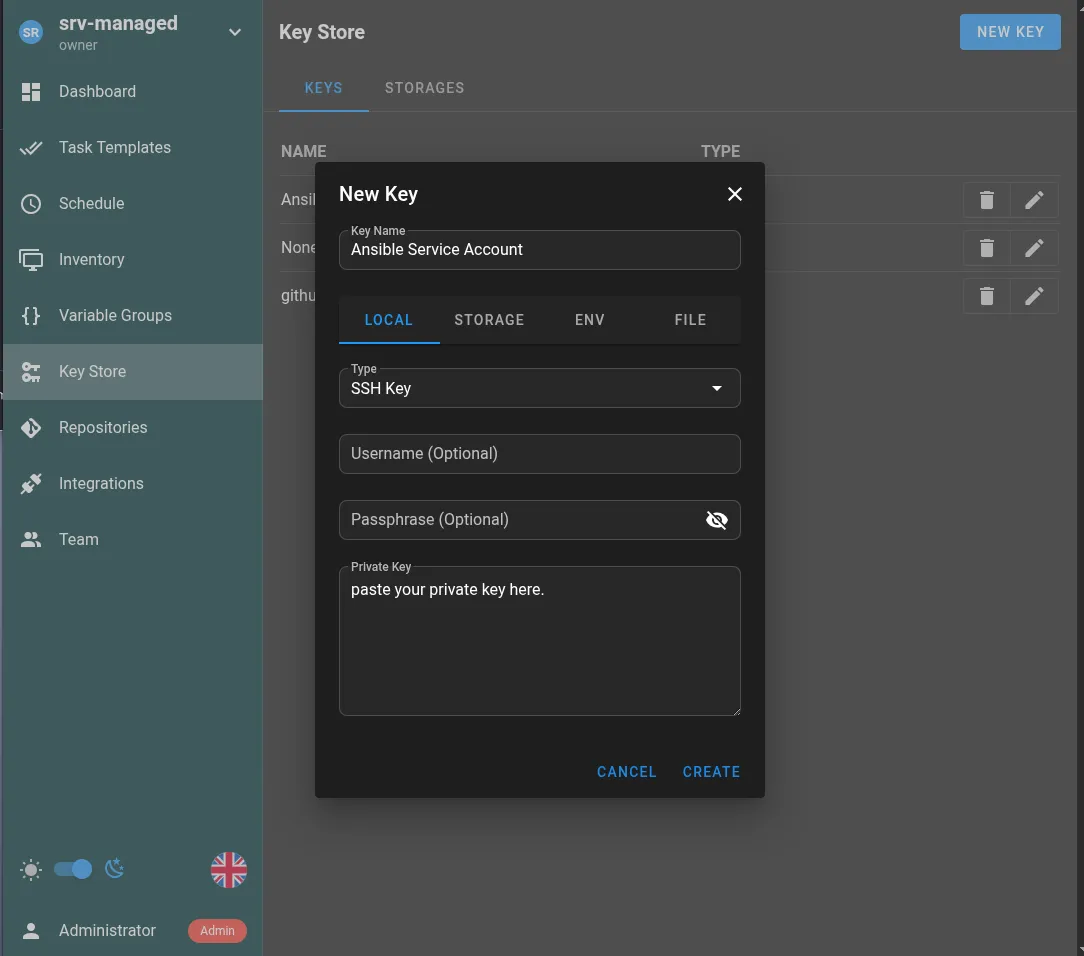
nano -w ~/.ssh/id_ansibleOpen your Semaphore UI webpage, log in, and click “Key Store” on the left-hand side.
Click the “New Key” button at the top right.
- Type: SSH Key
- Username: (leave blank)
- Passphrase: (leave blank)
- Private Key: Paste the contents of your clipboard from
~/.ssh/id_ansible
Create Ansible Service Accounts on LXCs
First, I’ll walk you through the intent using simple commands for each endpoint LXC. You don’t have to type these commands in. I’ve created a bash script below that can carry out this task on many LXCs.
This is just for your reference.
# 1. Create the useruseradd -m -s /bin/bash ansible
# 2. Setup the .ssh directorymkdir -p /home/ansible/.sshchmod 700 /home/ansible/.ssh
# 3. Add your PUBLIC key (the .pub file) to authorized_keys# Replace 'YOUR_PUBLIC_KEY_STRING' with the actual text from ~/.ssh/id_ansible.pubecho "YOUR_PUBLIC_KEY_STRING" > /home/ansible/.ssh/authorized_keyschmod 600 /home/ansible/.ssh/authorized_keyschown -R ansible:ansible /home/ansible/.ssh
LXC Onboarding Script
Run this bash script from your Proxmox host against your LXCs. It handles OS detection and creates the ansible service account.
This script deploys your ansible SSH public key, configures passwordless sudo, and restarts SSH all in one pass.
- Edit the public key in this script with your own
id_ansible.pubcontents. - Edit the range of Proxmox LXC IDs you want to onboard.
From your Proxmox host as root:
nano ~/ansible_create_service_accounts_script.sh#!/bin/bash
# Your Semaphore Public KeyPUB_KEY="ssh-ed25519...YOUR PUBLIC KEY ...semaphore-automation"
# Adjust range as needed for your LXC IDsfor id in {100..110}; do # Check if the container exists and is running status=$(pct status $id 2>/dev/null) if [[ $? -ne 0 || "$status" != *"status: running"* ]]; then continue fi
echo "--- Processing LXC $id ---"
pct exec $id -- /bin/sh -c " # 1. OS Detection & Dependency Install if [ -f /usr/bin/apk ]; then echo 'Detected Alpine Linux' apk add --no-cache sudo shadow openssh-sftp-server openssh SHELL_BIN='/bin/sh' SSH_SERVICE='sshd' elif [ -f /usr/bin/apt ]; then echo 'Detected Debian/Ubuntu' apt-get update && apt-get install -y sudo openssh-server SHELL_BIN='/bin/bash' SSH_SERVICE='ssh' else echo 'Unknown OS, attempting generic setup...' SHELL_BIN='/bin/sh' SSH_SERVICE='sshd' fi
# 2. User Creation & Account Unlocking if ! id -u ansible >/dev/null 2>&1; then useradd -m -s \"\$SHELL_BIN\" ansible fi # Ensure account is not locked (Common Alpine issue) if [ -f /etc/shadow ]; then passwd -u ansible 2>/dev/null fi
# 3. SSH Directory & Key Setup mkdir -p /home/ansible/.ssh
# 4. SSH StrictModes Fix (Crucial for Alpine/Hardened templates) # Home dir must NOT be group-writable chown root:root /home/ansible chmod 755 /home/ansible
# Check if key exists, otherwise append if ! grep -q \"$PUB_KEY\" /home/ansible/.ssh/authorized_keys 2>/dev/null; then echo \"$PUB_KEY\" >> /home/ansible/.ssh/authorized_keys fi
# Set strict perms on the .ssh folder itself chown -R ansible:ansible /home/ansible/.ssh chmod 700 /home/ansible/.ssh chmod 600 /home/ansible/.ssh/authorized_keys
# 5. Sudoers Configuration mkdir -p /etc/sudoers.d echo 'ansible ALL=(ALL) NOPASSWD:ALL' > /etc/sudoers.d/ansible chmod 440 /etc/sudoers.d/ansible
# 6. Force SSHD to allow PubKey and use correct keys file sed -i 's/#PubkeyAuthentication yes/PubkeyAuthentication yes/' /etc/ssh/sshd_config sed -i 's/#AuthorizedKeysFile/AuthorizedKeysFile/' /etc/ssh/sshd_config
# 7. Restart SSH service to apply changes if [ -f /etc/init.d/\$SSH_SERVICE ]; then /etc/init.d/\$SSH_SERVICE restart elif command -v systemctl >/dev/null 2>&1; then systemctl restart \$SSH_SERVICE fi
echo 'LXC $id Onboarding Complete!' "doneSet the script to executable and run it.
chmod +x ~/ansible_create_service_accounts_script.sh./ansible_create_service_accounts_script.shConfigure Privilege Escalation in Semaphore
Inside Semaphore, we need to configure how Ansible escalates privileges when connecting to our LXCs. We set up environment variables in Semaphore for LXC-Sudo using JSON, like this:
- In the Semaphore UI, click “Variable Groups” from the left menu.
- Click “New Group”.
- Select “JSON” from the modal box.
- Paste in the following JSON.
{ "ansible_become": true, "ansible_become_method": "sudo", "ansible_become_user": "root"}Set Up Inventory of Hosts in Semaphore
Once your endpoints are configured, the next step is defining your inventory: the hosts Ansible will target. Inventories are defined in YAML and group your hosts logically.
Inventories are selected based on task. You can have as many as you wish, whether you want to target specific hosts or all hosts. This will be important later when we create tasks in Semaphore and choose which machines they execute on.
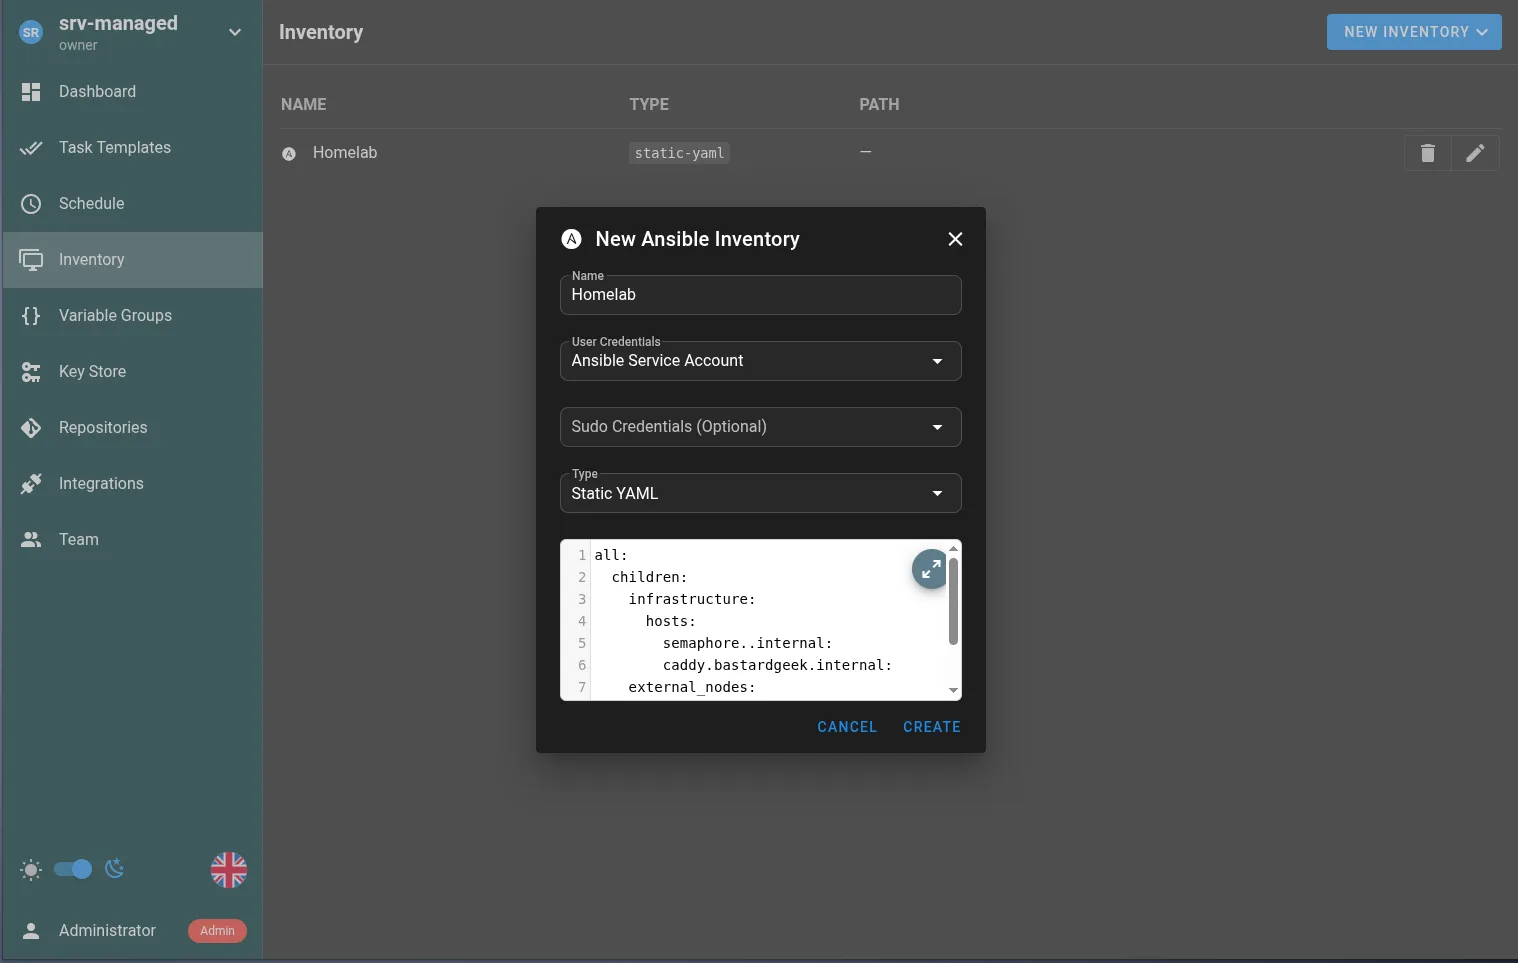
- In Semaphore UI, click “Inventory” on the left navigation menu.
- Click the “New Inventory” button at the top right of the page.
- Fill in the boxes. I’ve included an example below.
- Name: Homelab
- User Credentials: Ansible Service Account
- Sudo Credentials (Optional): Blank
- Type: Static YAML
Here’s an example YAML where I’ve included hosts by DNS and hosts by IP as examples. Add as many subcategories as you wish, but be mindful of strict YAML spacing rules.
all: children: infrastructure: hosts: semaphore.domain.internal: caddy.domain.internal: external_nodes: hosts: web_server_01: ansible_host: 192.168.XXX.XXXI keep bringing up words like hosts, LXCs, endpoints, and servers interchangeably. As you can see from the inventory, it’s really just any endpoint that accepts SSH.
Set Up Repositories
To set up a proper CI/CD pipeline, we should really be using some sort of git tracking and connecting Semaphore UI to the repository. In this example, I’m using GitHub, but any git-based system will work.
This is beneficial for a number of reasons:
- All of our playbooks exist on a separate system, which acts as a sort of passive backup.
- All the benefits of git.
- Multiple people can maintain a single playbook base. This is less important for most homelabs, but it can make it easier to get help from a buddy when sharing a playbook with someone else.
Considerations:
- A public repository means your playbooks can be read by others. Keep that in mind and don’t share secrets accidentally. Semaphore has a number of solutions within the interface to set variables, secrets as files, etc.
Connect GitHub to Semaphore
- Go ahead and create a Playbooks repository if you haven’t already.
- Go to “Settings” for that repository.
- Click “Deploy keys” on the left side of the page.
- Click the “Add deploy key” button.
Leave that tab open and switch back to your Semaphore Server CLI. We’ll create a new key for GitHub similar to how we created the Ansible Public/Private key pair above.
ssh-keygen -t ed25519 -C "semaphore-to-github" -f ~/.ssh/id_semaphore_githubNow we need to copy the new public key to our GitHub repo.
nano -w ~/.ssh/id_semaphore_github.pub- Copy the entire key.
- Paste the key contents into the “Add deploy key” form on GitHub.
Now open a tab to your Semaphore UI:
- Choose “Key Store” on the left side menu.
- Click “New Key” button just like we did with the Ansible key.
- Key Name: github-ssh-key
- Type: SSH Key
- Username: (leave blank)
- Passphrase: (leave blank)
- Private Key: Paste the contents of your clipboard from
~/.ssh/id_semaphore_github
- Save.
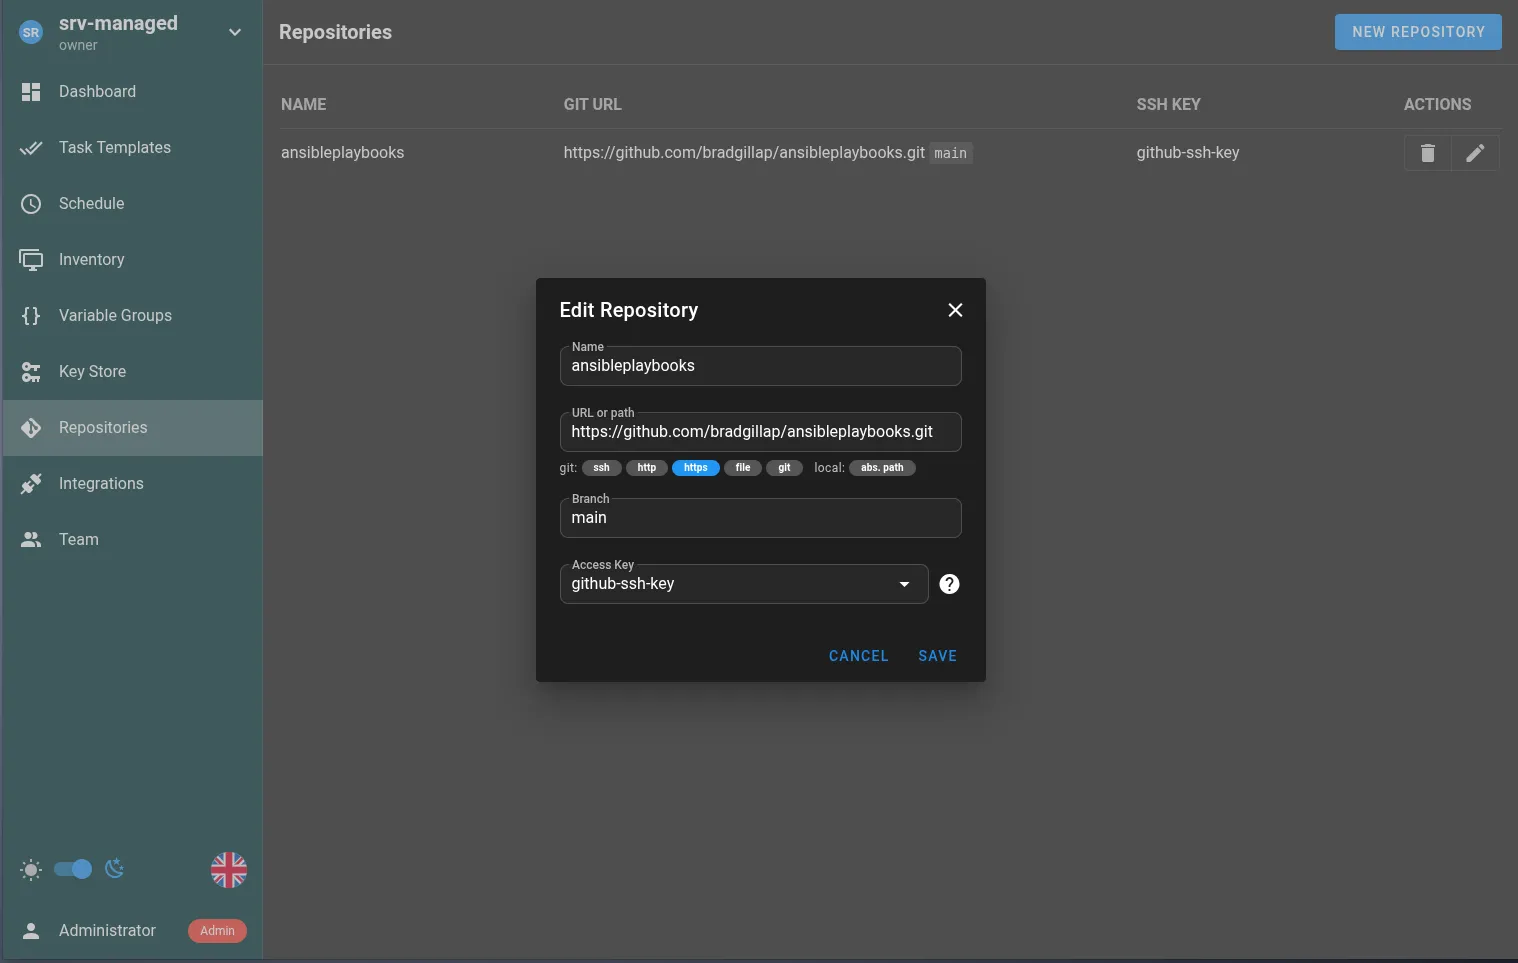
Now add the new repository:
- Choose Repositories from the left side menu.
- Click the “New Repository” button.
Fill in the fields as follows:
- Name: homelab-ansible-playbooks
- URL: The URL found on the git repository page. Example:
https://github.com/bradgillap/ansibleplaybooks.git - Branch: main
- Access Key: github-ssh-key
- Save.
Workflow Example
- When we create playbooks for Ansible, we commit our changes to the GitHub repository.
- Executing an Ansible task in Semaphore UI pulls the latest playbooks from the repository.
- Ansible compares locally stored playbooks to the repository code to make sure it’s current.
- Ansible processes the playbook, logging and reporting any errors to the UI.
- Semaphore UI stores a nice audit log of past execution actions.
Testing
Alright! Yes, that was a lot to do but we should now have a system where we can write Playbooks, store them on a git repo and deploy them as tasks.
So let’s create our first test task.
Create a playbook in your repository:
---- name: Test LXC Connectivity hosts: all # This targets everything in your Semaphore Inventory gather_facts: false tasks: - name: Try to ping the containers ansible.builtin.ping:In your Semaphore UI:
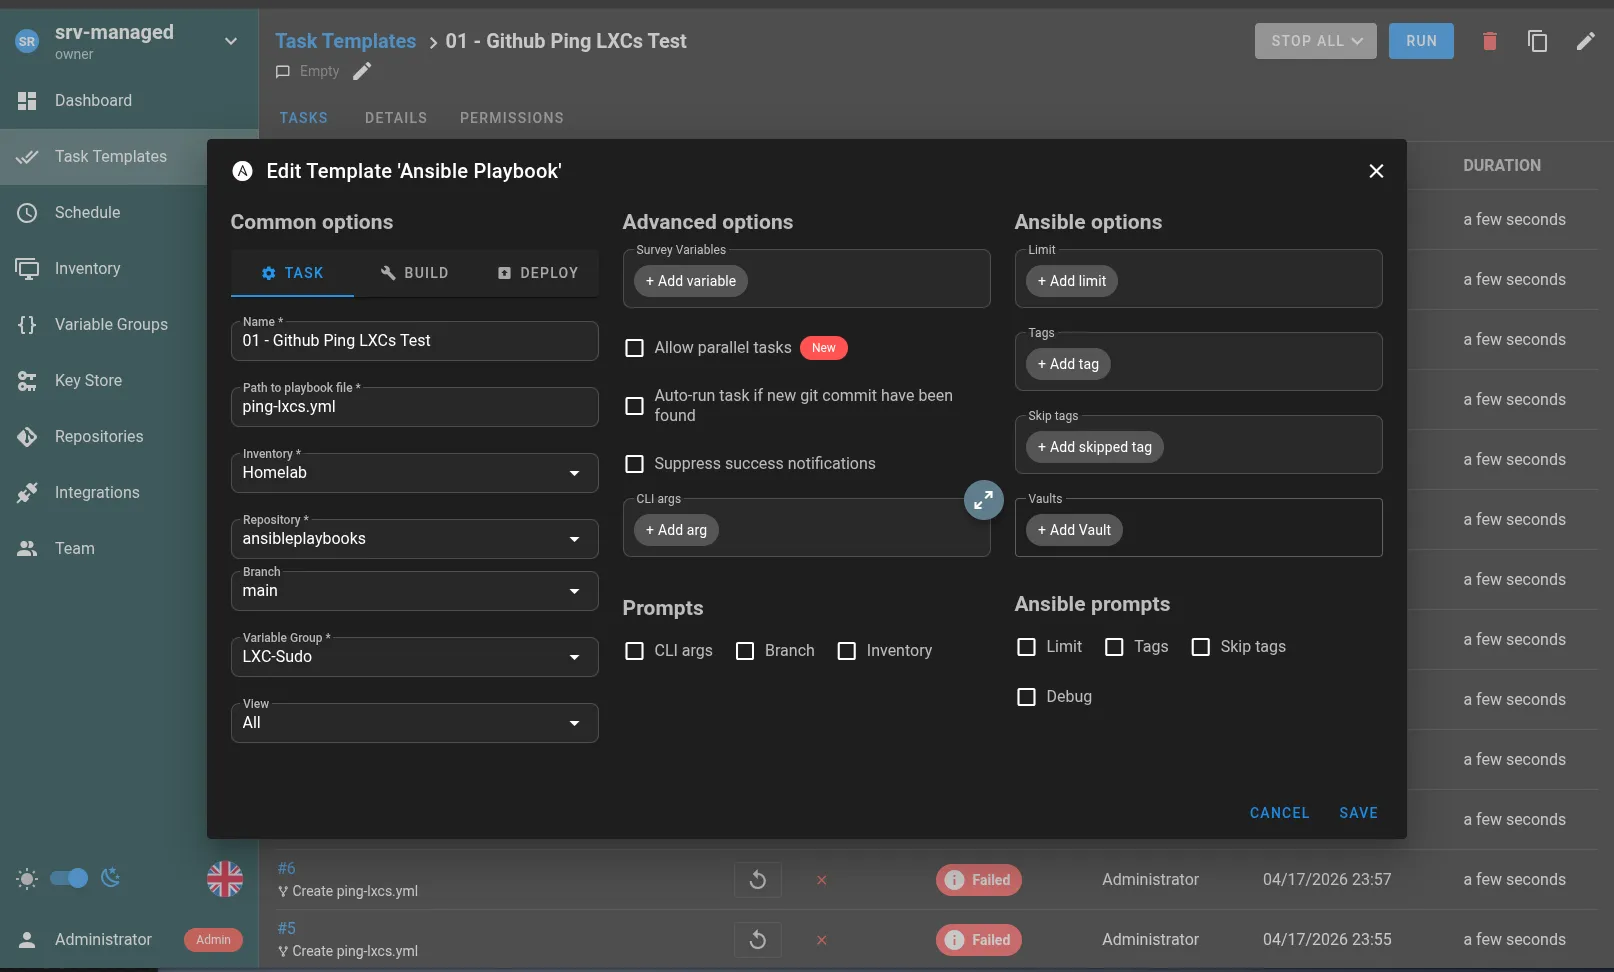
- Click “Task Templates” on the left side navigation menu.
- Click the “New Template” button and choose “Ansible Playbook”.
- Look for the “Repository” dropdown and click “Set Branch”
Fill out the following options:
- Name: 01 - Github Ping LXCs Test
- Path to playbook file: If the file is in the root of your repository it’s just the filename. Mine is ping-lxcs.yml
- Inventory: Homelab or whatever you named the inventory of hosts.
- Repository: This is the name of the git repository we added earlier.
- Branch: Probably “main” if you used GitHub.
- Variable Group: LXC-Sudo
- View: All
Run the task and review the log. If everything is set up properly, it should say success once completed.
If that worked out okay, you can now create more tasks and write more Ansible playbooks. If you need some inspiration for common Debian-based tasks, I have a small repo located below.
Just the Beginning
Infrastructure as code is an entire world unto itself and the professional side of enterprise IT. There are many resources online and examples to draw from. Ansible on its own has many more features you should explore as you standardize your pipelines. Just like Ansible, Semaphore UI also has an expanded system of automation. This well runs very deep. I recommend spending some time on the Ansible documentation website at the very least. Try writing a few custom playbooks yourself. It may also be a good idea to set up a second inventory with a test Debian LXC for testing your scripts, to prevent unexpected accidents when taking destructive actions.
References
[1] Michielverbeek, "Gelsenkirchen-Erle, pipeline along the Emscher," *Wikimedia Commons* 2018. [Online]. Available: https://commons.wikimedia.org/wiki/File:Gelsenkirchen-Erle,_leiding_langs_de_Emscher_IMG_8418_2018-09-01_12.05.jpg Accessed: Apr. 19, 2026.
[2] R. Hat, "Ansible Documentation," *Ansible* 2026. [Online]. Available: https://docs.ansible.com/ Accessed: Apr. 19, 2026.
[3] S. Community, "Semaphore UI Documentation," *Semaphore UI* 2026. [Online]. Available: https://semaphoreui.com/docs/ Accessed: Apr. 19, 2026.
[4] P. S. S. GmbH, "Proxmox VE Documentation," *Proxmox* 2026. [Online]. Available: https://pve.proxmox.com/pve-docs/ Accessed: Apr. 19, 2026.